Easy Chicken Brine Recipe for Juicy Results
Ever wondered how to make chicken juicy and flavorful every time? The secret is brining. This chicken brine recipe will make your chicken tender, moist, and delicious. It will make your taste buds happy.
Table of Contents
Brining changes the game for chicken. It soaks the chicken in a salt-water mix. This lets the meat soak up more moisture and flavor, making it juicier and tender. It works for roasting or grilling chicken, ensuring it’s perfect every time.
With simple ingredients and a bit of planning, you can make amazing chicken. This easy brine recipe makes chicken incredibly juicy and flavorful. No more dry chicken. Say hello to juicy, tender meat that everyone will love.
Key Takeaways:
- Brining chicken results in juicier, more tender, and flavorful meat
- This simple chicken brine recipe can be used for whole chickens or chicken pieces
- Brining times vary depending on the size and type of chicken being prepared
- Basic brine ingredients include water, salt, sugar, and optional flavorings like herbs and spices
- Proper brining technique and temperature control are essential for optimal results
Why Brining Chicken is the Secret to Juicy, Flavorful Meat
Brining chicken is a simple trick to make your dishes better. It involves soaking the meat in a saltwater mix. This makes the chicken juicy and full of flavor, even if it’s a bit overcooked.

How Brining Works to Tenderize and Flavor Chicken
Brining changes the chicken’s muscle tissue. The meat soaks up the liquid, making it swell and hold more moisture. This keeps the meat tender and juicy, even when cooked at high heat for a long time.
Brining also lets you add extra flavors to the chicken. By adding herbs, spices, and aromatics to the brine, you can make the chicken taste even better. This way, you can create a dish with a unique and delicious flavor.
The Science Behind Brining and Its Effects on Meat
The science of brining is based on osmosis and diffusion. Salt ions move into the meat, and water molecules move into the muscle fibers. This increases the meat’s moisture and makes it tender.
Many studies show that brining improves chicken’s juiciness, tenderness, and taste. Even famous chefs and restaurants like Glebe Point Diner and Restaurant Hubert in Sydney use brining for their roast chicken.
| Ingredient | Amount | Purpose |
|---|---|---|
| Cold Water | 2 liters / 2 quarts | Base for the brine solution |
| Kosher or Cooking Salt | 1/3 cup | Tenderizes and flavors the chicken |
| Brown Sugar (optional) | 1/4 cup | Balances the saltiness and adds subtle sweetness |
Understanding brining’s science can help you make better chicken dishes. Whether you’re roasting a whole bird or grilling pieces, brining will make your chicken juicy, flavorful, and tender. It’s a great way to impress your loved ones.
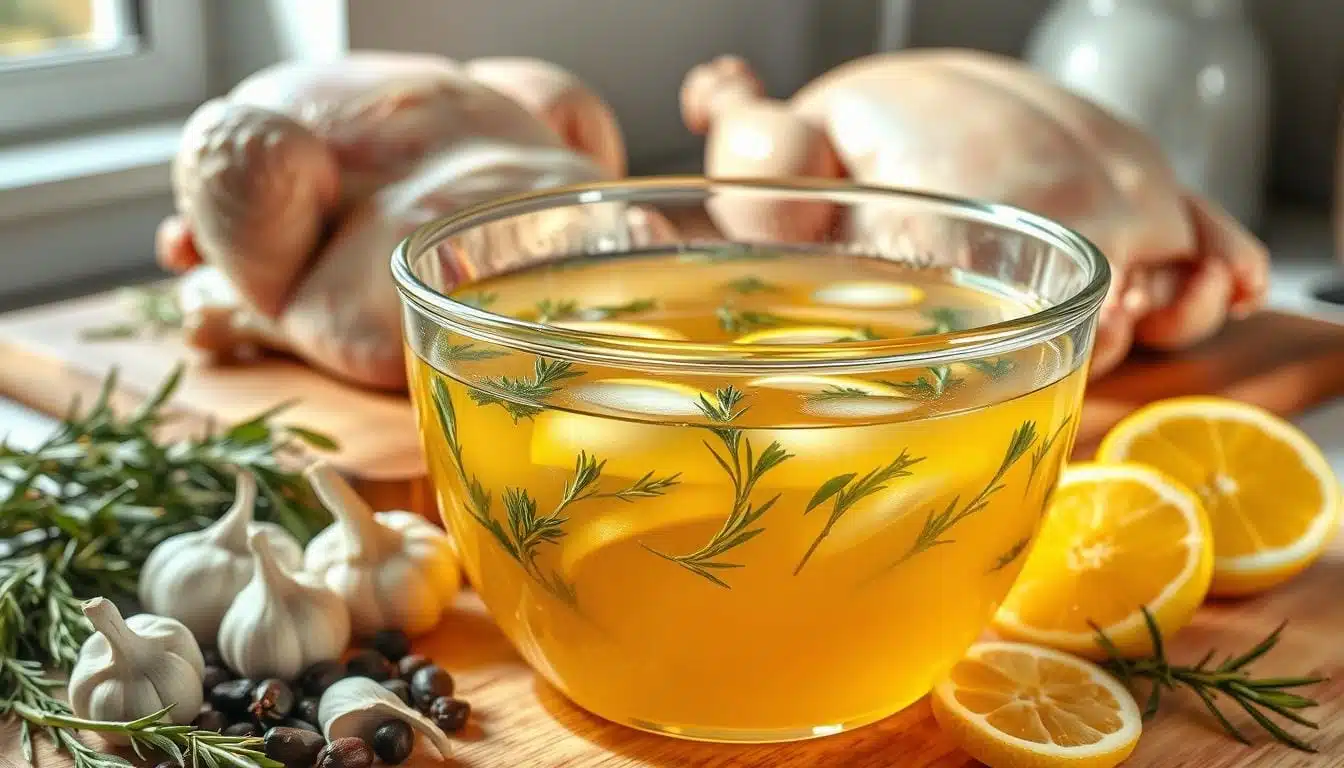
Essential Ingredients for a Simple, Effective Chicken Brine Recipe
To make a juicy and flavorful chicken dish, start with the right brine ingredients. Salt and water are the key components. They form the base of any good brine.

Salt: The Key to Tenderizing and Flavoring
Salt is crucial for tenderizing and flavoring the chicken. Use kosher salt, not table salt, as it’s measured differently. The recipe calls for 1/2 cup of kosher salt for the best results.
Water: The Base of Your Brine Solution
Water is the base of your brine. It helps the salt and flavors get into the chicken. For a 3-5 pound chicken, use 8 cups of water. The right water-to-salt ratio is key for tenderness and flavor.
Optional Ingredients for Added Flavor
While salt and water are essential, you can add more ingredients for extra flavor. Some popular choices include:
- Honey or brown sugar: Add 1/4 cup for a sweet touch.
- Fresh or dried herbs: Herbs like parsley, thyme, and rosemary add aroma. Mix your favorites for a unique taste.
- Peppercorns or ground pepper: They add a subtle heat and depth.
- Citrus slices: Lemon, lime, or orange slices bring a bright, zesty flavor.
- Garlic and bay leaves: Crushed garlic and bay leaves give a savory, earthy taste.
Try different optional ingredients to make your chicken brine unique. Whether you like a classic herb brine or something spicier, you can experiment endlessly.
Step-by-Step Guide to Making the Perfect Chicken Brine Recipe
Making a flavorful and juicy chicken dish is simple with this brine recipe. Follow these steps to serve a delicious meal that will wow your family and friends. Here’s how to make chicken brine recipe:
- In a large pot, mix 1 gallon of water, 3/4 cup coarse kosher salt, 2/3 cup sugar, and your choice of ingredients like garlic, herbs, and lemon slices.
- Heat the mixture until it boils, stirring now and then to dissolve the salt and sugar.
- Take the pot off the heat and let the brine cool down to room temperature. You can speed up cooling by adding ice cubes or refrigerating it.
- Once the brine is cool, put your chicken in a big, non-reactive container or a resealable plastic bag. Pour the brine over the chicken, making sure it’s fully covered.
- Put the brining chicken in the fridge for 12 to 24 hours, depending on the chicken’s size. For best results, brine a 4-5 pound chicken for 24 hours.
- When you’re ready to cook, take the chicken out of the brine and dry it with paper towels. Throw away the used brine.
- Brush the chicken with butter or oil, and add more herbs or spices if you like.
- Roast, grill, or cook the chicken as you prefer, following your recipe’s instructions.

By following these steps, you’ll make a juicy and flavorful chicken dish. The secret to success is giving the brine enough time to work its magic. This infuses the meat with moisture and flavor.
| Ingredient | Amount |
|---|---|
| Water | 1 gallon |
| Coarse Kosher Salt | 3/4 cup |
| Sugar | 2/3 cup |
| Additional Flavorings (optional) | Garlic, herbs, lemon slices, etc. |
It’s as easy as this: Bring all the brine ingredients to a boil with a bit of water – just to bring out flavour a bit and dissolve the salt. Add cold water to bring the temperature down, then refrigerate until fully chilled. Submerge chicken upside down (ie drumsticks and breast facing down) and brine for 24 hours in the fridge (even 12 hours is terrific). Pat dry, brush with butter and roast!
With this guide, you’ll elevate your chicken dishes to new heights of flavor and juiciness. Try different herbs, spices, and aromatics to make your own unique brine. Impress your guests with your cooking skills.
How Long to chicken brine recipe for Optimal Results
Brining chicken makes it juicy and flavorful. But how long should you brine it for the best taste? The answer varies based on the chicken cut and other factors. Let’s look at the best brining times for different chicken types and what to consider.

Brining Times for Different Cuts of Chicken
The size and type of chicken you brine affect the brining time. Here’s a guide for different chicken cuts:
- Chicken breasts: Brine them for 30 minutes to one hour. A 15-minute brine adds a light salt flavor. A one-hour brine makes the meat juicy and tender.
- Bone-in chicken pieces: Brine them for about four hours. This lets the brine soak into the meat well.
- Whole chicken: Brine a whole chicken for at least four hours or overnight. This ensures the whole bird is seasoned and tender.
Brining chicken too long can make it too salty and mushy. Brining chicken breasts for more than two hours can make them too salty. A four-hour brine can also make them too salty for eating alone. An eight-hour brine makes the chicken inedible, with a spongy texture.
Factors That Affect Brining Time
Several factors besides the chicken cut can change the brining time:
- Brine temperature: Cold water brining makes the chicken more tender and juicy. Warm water can make the chicken less juicy.
- Brining and freezing: Brine chicken breasts for 30 to 60 minutes before freezing. Use them within six months to keep the texture good.
- Brining method: There are wet and dry brining methods. Wet brining involves soaking the chicken in saltwater. Dry brining uses a salt rub. Dry brining can make the skin crisper.
| Chicken Cut | Recommended Brining Time |
|---|---|
| Chicken Breasts | 30 minutes to 1 hour |
| Bone-in Chicken Pieces | 4 hours |
| Whole Chicken | 4 hours to overnight |
Brining chicken can help the meat retain up to 40% more moisture while cooking.
Follow these brining time guidelines and consider the factors that affect brining. This way, you’ll get perfectly seasoned, juicy, and tender chicken every time. Always brine chicken in the fridge for safety. Use a meat thermometer to check for doneness, as brined chicken cooks faster.
Tips for Ensuring Even Brining and Avoiding Common Mistakes
To get the best results from brining chicken, it’s key to use the right methods and avoid common errors. Focus on the brining container, temperature, and technique. This way, you’ll get even brining and chicken that’s juicy and full of flavor every time.
Proper Container Selection and Brining Technique
Brine foods in a food-grade, nonreactive container like a stainless steel or enameled stockpot. You can also use a brining bag or a food-grade plastic bucket. Make sure the container is big enough to hold the chicken and brine solution well, so the meat can be fully covered.
When putting the chicken in the brine, place the breast side down. This helps the brine reach the thickest part of the meat better. Even if the underside of the chicken isn’t fully covered, as long as the breast is, the brining will still work well.
Tip: To keep the chicken fully submerged, you can place a heavy plate or bowl on top of the meat to weigh it down.
Maintaining the Right Temperature During Brining
One big mistake in brining is not keeping the right temperature. To stay safe, make sure the brine solution is chilled before adding the chicken. The best brining temperature is between 35°F and 40°F (1.7°C to 4.4°C).
If you’re brining a lot of chicken or in a warm place, you might need to add ice to the brine. Or, you can put the brining container in the fridge to keep it at a safe temperature all through the process.
| Brining Temperature | Effect on Chicken |
|---|---|
| Below 35°F (1.7°C) | Brine may not penetrate the meat effectively |
| 35°F to 40°F (1.7°C to 4.4°C) | Ideal brining temperature range |
| Above 40°F (4.4°C) | Potential bacterial growth and health risks |
By following these tips for choosing the right container, brining technique, and temperature control, you can avoid common mistakes. This leads to chicken that’s tender, juicy, and full of flavor. Your family and friends will love it.
Customizing Your Chicken Brine recipe with Herbs, Spices, and Aromatics
A simple saltwater brine can make chicken taste amazing. But, adding herbs, spices, and aromatics takes it to a whole new level. It’s a great way to give your chicken unique flavors that match your cooking style and dish.
By trying out different ingredients, you can make a brine that’s all your own. This will make your chicken truly stand out.

Popular Herb and Spice Combinations for Chicken Brine Recipe
Choosing herbs and spices for your brine is key. Classic pairs that go well with chicken include:
- Rosemary, thyme, and parsley: This trio brings a Mediterranean taste to your brine.
- Bay leaves and black peppercorns: They add a subtle, earthy flavor that complements chicken well.
- Sage, onion powder, and paprika: This mix gives a savory, smoky taste that’s great for roasted or grilled chicken.
A basic brine recipe can have 2 cups of water, 2.5 tablespoons of kosher salt, 1 tablespoon of peppercorns, and a sprig of fresh rosemary. This combo seasons the chicken well. Adding herbs and aromatics boosts the flavor even more.
Using Citrus, Garlic, and Other Aromatics to Enhance Flavor
Citrus fruits, garlic, and other aromatics can also enhance your chicken brine. Some favorites are:
- Lemon or orange slices: They add a fresh, tangy flavor and help tenderize the meat.
- Garlic cloves: Crushed or minced garlic adds a savory, pungent taste that goes well with herbs like rosemary and thyme.
- Sliced onions or shallots: They bring a subtle sweetness and depth to the brine.
- Honey or brown sugar: A bit of sweetness balances the brine’s saltiness and helps with caramelization.
| Ingredient | Amount | Purpose |
|---|---|---|
| Parsley sprigs | 5 | Adds fresh, herbaceous flavor |
| Thyme sprigs | 3 | Provides earthy, slightly minty notes |
| Rosemary sprigs | 3 | Contributes a fragrant, pine-like aroma |
| Bay leaves | 3 | Imparts a subtle, earthy flavor |
| Garlic cloves | 5 | Infuses the brine with savory, pungent notes |
| Lemons | 2 | Adds a bright, citrusy tang |
| Honey | ¼ cup | Balances the saltiness with a touch of sweetness |
Don’t be afraid to mix and match herbs, spices, and aromatics to find your perfect flavor. Tailoring your brine will result in chicken that’s not only tender but also full of flavor. It’s sure to impress anyone.
Brining Chicken Breasts, Thighs, and Wings: Adapting the Recipe
Brining chicken is a great way to make it juicy and flavorful. But, you need to adjust the brine strength and soaking time for each cut. This ensures that chicken breasts, thighs, and wings turn out perfectly.
Adjusting Brine Strength and Time for Different Cuts
Here are some tips for brining different chicken cuts:
- Chicken breasts: Brine boneless, skinless chicken breasts for 30-60 minutes at room temperature or 1-2 hours refrigerated. Breasts are lean and quick-cooking, so a shorter brining time prevents them from becoming overly salty.
- Chicken thighs: Brine bone-in thighs for up to 6 hours. Thighs have more fat and connective tissue, allowing them to withstand longer brining times without becoming overly salty or mushy.
- Chicken wings: Brine wings for up to 8 hours or overnight. The high skin-to-meat ratio of wings allows them to absorb more flavor during the brining process.

Always adjust the brine strength based on the size and cut of the chicken. A general rule of thumb is to use 1 tablespoon of salt per cup of water for a standard brine. For smaller cuts like wings or boneless breasts, reduce the salt to 2 teaspoons per cup of water to avoid over-brining.
| Chicken Cut | Brining Time | Brine Strength |
|---|---|---|
| Boneless, skinless breasts (6 oz.) | 30-60 minutes at room temp; 1-2 hours refrigerated | 2 tsp salt per cup of water |
| Bone-in thighs | Up to 6 hours | 1 tbsp salt per cup of water |
| Wings | Up to 8 hours or overnight | 2 tsp salt per cup of water |
By tailoring your brine recipe to the specific cut of chicken you’re working with, you’ll ensure that each piece is perfectly seasoned and tender, making for a more enjoyable dining experience. Remember, the key to successful brining is finding the right balance of time and salt concentration for each type of chicken cut.
Preparing Brined Chicken for Cooking: Rinsing, Drying, and Seasoning
After brining your chicken, it’s time to get it ready for cooking. Start by rinsing the chicken under cold water. This removes extra salt, making sure your chicken won’t taste too salty.
Next, dry the chicken well. Use paper towels to pat it dry, focusing on the cavity and any skin folds. Dry skin leads to crispy skin when cooked.
To get even crisper skin, let the chicken air dry in the fridge. Place it on a wire rack over a baking sheet. Let it sit until you’re ready to cook. This step dries the skin further, making it crispy.
When seasoning, remember the chicken has already absorbed a lot of salt. So, don’t add more salt. Instead, use black pepper, herbs, or spices that match your dish.
Brushing the chicken with melted butter before roasting or grilling can add an extra layer of flavor and help achieve a beautiful golden-brown color.
By rinsing, drying, and seasoning your brined chicken right, you’ll enjoy a delicious and juicy meal. The brining technique really makes a difference.
Cooking Methods That Showcase the Benefits of Brined Chicken
After brining your chicken, it’s time to cook it to perfection. Brining makes the meat taste better and feel softer, no matter how you cook it. Whether you roast, grill, or smoke, brined chicken will impress with its juicy and flavorful results.
Roasting Brined Chicken for Crispy Skin and Juicy Meat
Roasting brined chicken in the oven gives you crispy skin and tender meat. Preheat your oven to 385°F (195°C). Place the brined chicken on a rack in a roasting pan. Brush the skin with olive oil and add your favorite spices.
Roast the chicken for about 50 minutes. Check the internal temperature after 40 minutes to avoid overcooking. The chicken is ready when it reaches 165°F (74°C).
| Chicken Cut | Roasting Time (at 385°F) |
|---|---|
| Whole Chicken (3-4 lbs) | 50-60 minutes |
| Chicken Breasts | 25-30 minutes |
| Chicken Thighs | 35-40 minutes |
| Chicken Wings | 20-25 minutes |
Grilling and Smoking Brined Chicken for Added Flavor
Grilling and smoking brined chicken add a smoky flavor. When grilling, preheat your grill to medium-high heat. Cook the chicken for 6-8 minutes per side, until it reaches 165°F (74°C).
For smoking, set your smoker to 225-250°F (107-121°C). Smoke the chicken for 1.5-2 hours, until it reaches the same internal temperature.
“Brining chicken before grilling or smoking takes the flavor and texture to a whole new level. The salt in the brine helps to break down the tough proteins, resulting in a more tender and juicy finished product.”
– Chef Michael Smith
Brining your chicken before cooking ensures a flavorful, moist, and tender result. Try different herbs, spices, and aromatics in your brine to create your own flavor. Enjoy the delicious benefits of brined chicken every time you cook.
Pairing Brined Chicken with Side Dishes and Sauces
Brined chicken offers endless options for side dishes and sauces. Its moist and flavorful meat pairs well with many accompaniments. Whether you like classic comfort foods or adventurous flavors, there’s a perfect side dish for brined chicken for everyone.
Potatoes au gratin is a popular choice for brined chicken. It has tender layers of potatoes baked in a rich cheese sauce. For a lighter option, mashed cauliflower is a great choice. It’s a low-carb alternative to mashed potatoes that complements the chicken well.
Vegetables add color and nutrition to your meal. Roasted carrots, bell peppers, and zucchini are a great choice. A simple side salad with mixed greens, cherry tomatoes, and a light vinaigrette also pairs well with the chicken.
A classic pan sauce is a delicious choice for brined chicken. Start by making a roux with butter and flour in the chicken pan. Then, whisk in chicken broth and water until it’s the right consistency. Season with salt, pepper, and herbs for a flavorful sauce.
The chicken is so moist that you can serve it as is with a tiny drizzle of the pan juices (which are quite salty, so don’t go overboard!).
Try the Moroccan Dipping Sauce for a zesty and aromatic sauce. It combines lemon juice, ground cumin, paprika, cayenne pepper, salt, extra-virgin olive oil, and fresh herbs. Serve it at room temperature for a burst of Middle Eastern flavors.
| Side Dish | Description |
|---|---|
| Potatoes au Gratin | Thinly sliced potatoes baked in a creamy cheese sauce |
| Mashed Cauliflower | Low-carb alternative to mashed potatoes with a creamy texture |
| Roasted Vegetables | Colorful and nutritious mix of carrots, bell peppers, and zucchini |
| Side Salad | Mixed greens, cherry tomatoes, and light vinaigrette dressing |
Brined chicken is sure to be the star of your meal, no matter what side dishes and sauces you choose. Its juicy, flavorful meat and endless options make it a crowd-pleaser. Your family and friends will definitely ask for seconds.
Storing and Reheating Leftover Brined Chicken
After enjoying a delicious meal of brined chicken, you might have leftovers. It’s important to store and reheat them right to keep them safe and tasty. By following these tips, you can enjoy juicy, flavorful chicken for days.
Best Practices for Storing Brined Chicken Safely
To keep your brined chicken leftovers safe, follow these storage tips:
- Let the chicken cool to room temperature before storing. But don’t leave it out for more than 2 hours.
- Put the chicken in an airtight container or wrap it tightly with plastic wrap or aluminum foil.
- Store the brined chicken in the refrigerator for up to 3-4 days.
- For longer storage, remove the meat from the bones. Store it in a zip-top bag or airtight container in the freezer for up to 2-3 months.
Reheating Techniques to Maintain Moisture and Flavor
When reheating brined chicken leftovers, avoid overcooking. This can make the meat dry and tough. Try these methods to reheat your chicken while keeping it moist and flavorful:
- Oven: Preheat the oven to 325°F (165°C). Wrap the chicken in foil and place it in a baking dish. Bake for 10-15 minutes, or until the internal temperature reaches 165°F (74°C).
- Microwave: Place the chicken on a microwave-safe plate and cover it with a damp paper towel. Microwave on high for 1-2 minutes, or until heated through.
- Stovetop: Place the chicken in a skillet with a splash of water or broth. Cover the skillet and heat over medium-low heat until the chicken is warmed through.
By following these storage and reheating guidelines, you can enjoy your brined chicken leftovers in many dishes, such as:
- Chicken salad sandwiches
- Chicken and vegetable stir-fry
- Chicken tacos or burritos
- Chicken and pasta casseroles
With proper storage and reheating techniques, your brined chicken leftovers can be just as delicious and satisfying as the first time around.
Troubleshooting Common Issues with Chicken Brine Recipe
Brining chicken is simple, but sometimes problems can happen. Knowing how to fix these issues can make your chicken juicy and full of flavor. Here are some tips for chicken brine troubleshooting and fixing chicken brine issues.
Oversalting is a common problem. If your chicken tastes too salty, you might have used too much salt or brined it too long. Use kosher salt or coarse sea salt to avoid this. Also, follow the brining times for your chicken cut.
| Issue | Cause | Solution |
|---|---|---|
| Chicken is too salty | Too much salt in the brine or brined for too long | Adjust salt content or reduce brining time |
| Chicken lacks flavor | Not enough herbs, spices, or aromatics in the brine | Increase the amount of flavorings or brine for a bit longer |
| Chicken texture is too soft | Brined for too long | Reduce brining time, especially for smaller cuts of chicken |
If your chicken doesn’t taste flavorful, add more herbs, spices, and aromatics. You can also brine it a bit longer to soak up more flavors.
Remember, the key to successful brining is finding the right balance of salt, time, and flavorings for the specific cut of chicken you’re working with.
By following these tips and adjusting your brine recipe, you’ll make perfectly brined chicken every time. Don’t hesitate to try different flavors and brining times to find what you like best.
Conclusion
Learning how to brine chicken is key to making it juicy and flavorful. By understanding brining science and using the right ingredients, you can make your chicken dishes amazing. Over 105 comments from home cooks show how popular and effective brining is.
Brining chicken is quick, with breasts needing just 24 hours. Pork chops can be ready in 2-3 hours. The secret is a cold brine with the right salt, sugar, and water mix. This prevents bacteria and makes the meat tender and tasty. Try adding herbs, spices, and aromatics to your brine for unique flavors.
When working with raw chicken, food safety is very important. Use separate cutting boards and sanitize surfaces to avoid contamination. With practice, you’ll make brined chicken that wows everyone. Get ready to enjoy the delicious results of your brining skills!


